Generate C# client for OpenAPI - Revisited
I am working on an article for the blog that relies on a C# generated Open API client. I wrote an article on that a few years ago called "Generate C# client for OpenAPI". So I decided to check if the advice from that post would still be valid today. Combined with the fact that, according to analytics, it is one of my most popular articles to date, this post was born.
The solution provided relied on using an MSBuild task to generate the API on build using a tool called NSwag. However, even back then, in 2021, an alternative was already available. Steve Collins, another dotnet content creator, published an article called "Using OpenApiReference To Generate Open API Client Code". The alternative directly adds OpenAPI support to the project while still using NSWag under the hood. Back then, Steve mentioned that there was little documentation, and I was already familiar with doing it manually, so I decided to stick with that. Today I wanted to compare doing it manually or via the built-in mechanism.
Safe OpenAPI specification on build
The purpose of the post is not to detail how to configure an OpenAPI spec for your project since the standard template already supports Swashbuckle. You can find more information on that over at Microsoft Learn. One thing I like to add to the standard template, is that I want the specification to be part of the project output. We can achieve that with the Swashbuckle CLI, which you can install with the command dotnet tool install --local Swashbuckle.AspNetCore.Cli --version 6.4.0. Note that the version of the CLI must match the version of Swashbuckle used in the API project. After you install the tool, you can modify the csproj to look like this.
<Target Name="Generate OpenAPI Specification Document" AfterTargets="Build">
  <PropertyGroup>
    <OpenApiDocumentName>v1</OpenApiDocumentName>
    <ApiDll>$(OutputPath)$(AssemblyName).dll</ApiDll>
    <OutputApiDocument>$(OutputPath)$(AssemblyName).json</OutputApiDocument>
  </PropertyGroup>
  <Exec Command="dotnet swagger tofile --output $(OutputApiDocument) $(ApiDll) $(OpenApiDocumentName)" ContinueOnError="true" />
</Target>
The swagger command takes the output location (OutputApiDocument), the DLL for the specification (ApiDll) and the document name (OpenAPIDocumentName) as input parameters. The default name of the API document is v1. We use some existing MSBuild properties to populate these parameters, so in our case, OutputPath looks like bin/Debug/net7.0/ and AssemblyName is Demo. That means that after the project builds, a file bin/Debug/net7.0/Demo.json will contain our Open API Specification.
Note that as part of the bin folder, the specification is not under source control. Sometimes I place it in the project root to track any changes made to the specification. Doing so is especially useful for monitoring unexpected or unintended changes to the specification.
Use NSwag.MSBuild to generate a csharp client
To add NSwag manually to our project, we need the NSwag.MSBuild NuGet package. Which we can install via dotnet add package NSwag.MSBuild --version 13.18.2. The process is mostly the same as I detailed in 2021; one of the few changes is the target framework to use. Modify the csproj as follows:
<Target Name="NSwag" AfterTargets="PostBuildEvent" Condition=" '$(Configuration)' == 'Debug' ">
    <!--https://github.com/RicoSuter/NSwag/wiki/NSwag.MSBuild-->
    <!-- <Exec Command="$(NSwagExe_Net70) new" /> -->
    <PropertyGroup>
      <OpenApiDocument>../../Api/Demo/bin/Debug/net7.0/Demo.json</OpenApiDocument>
      <NSwagConfiguration>nswag.json</NSwagConfiguration>
      <GeneratedOutput>Client.g.cs</GeneratedOutput>
    </PropertyGroup>
    <Exec Command="$(NSwagExe_Net70) run $(NSwagConfiguration) /variables:OpenApiDocument=$(OpenApiDocument),GeneratedOutput=$(GeneratedOutput)" />
</Target>
You can uncomment $(NSwagExe_Net70) new to generate a fresh nswag.json, the configuration file used for NSwag. After you have the config file, you still need to specify the runtime, the document, and the output location. Abbreviated the change to the file looks like this:
{
  "runtime": "Net70",
  "defaultVariables": null,
  "documentGenerator": {
    "fromDocument": {
      "json": "$(OpenApiDocument)"
    }
  },
  "codeGenerators": {
     "openApiToCSharpClient": {
      // ...
      "output": "$(GeneratedOutput)"
      // ...
     }
  }
}
I don't remember it being possible back in 2021, but you can now change the JSON serializer used in the generated client. You can do so by modifying the value of codeGenerators openApiToCSharpClient jsonLibrary to SystemTextJson. If you do not do this, you must install the Newtonsoft.Json package, or the generated code will not compile.
Using OpenAPI Reference
Using OpenAPI reference from Visual Studio
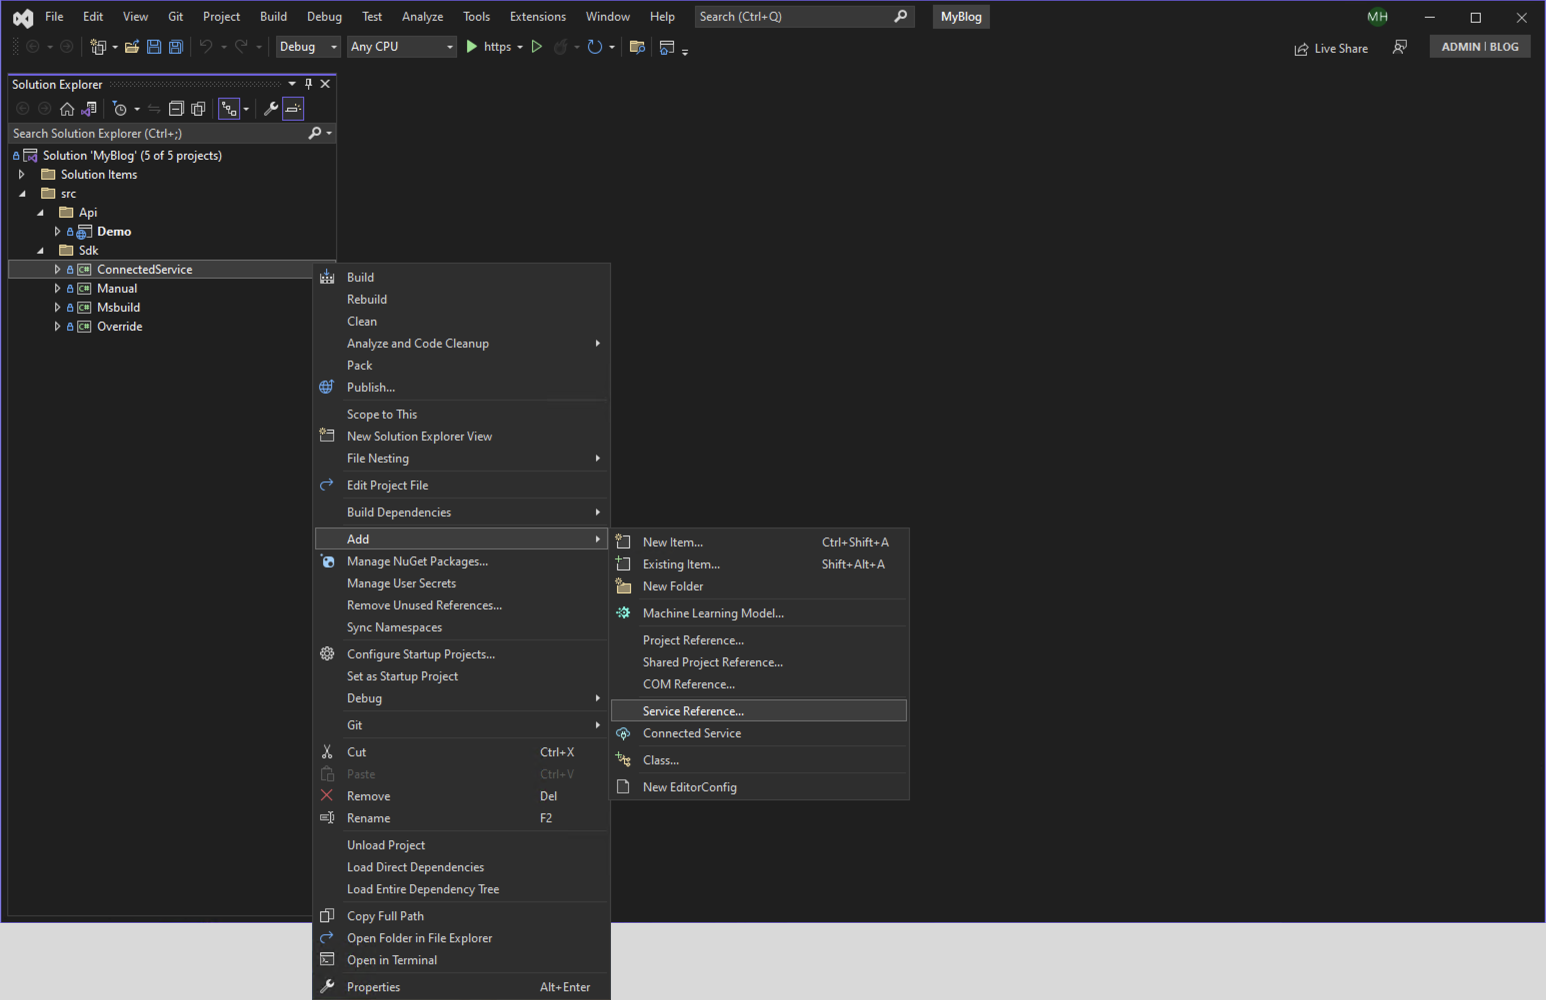
I can imagine that people do not like the manual way, especially if you don't know the inner workings of MSBuild; it can feel a bit like magic. Adding an OpenAPI reference via Visual Studio is as simple as right-clicking any project and choosing add connected service.


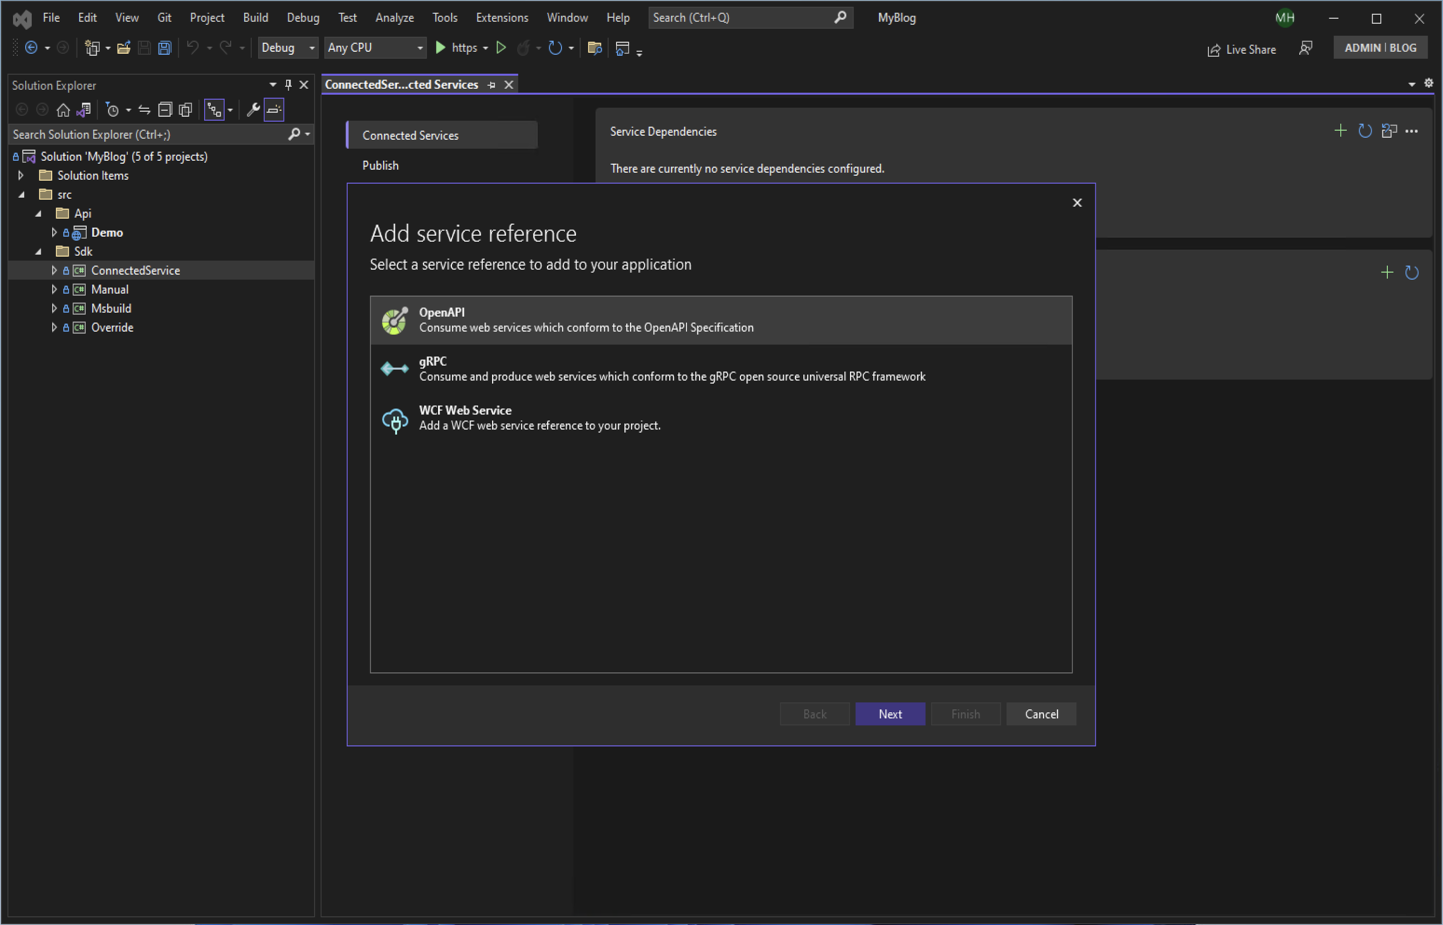
By choosing the option "Service reference..." instead of "Connected Service" you get the second prompt immediately. By selecting "Connected service" you get the overview of all connected services for the project and then need an extra click to add the service reference.
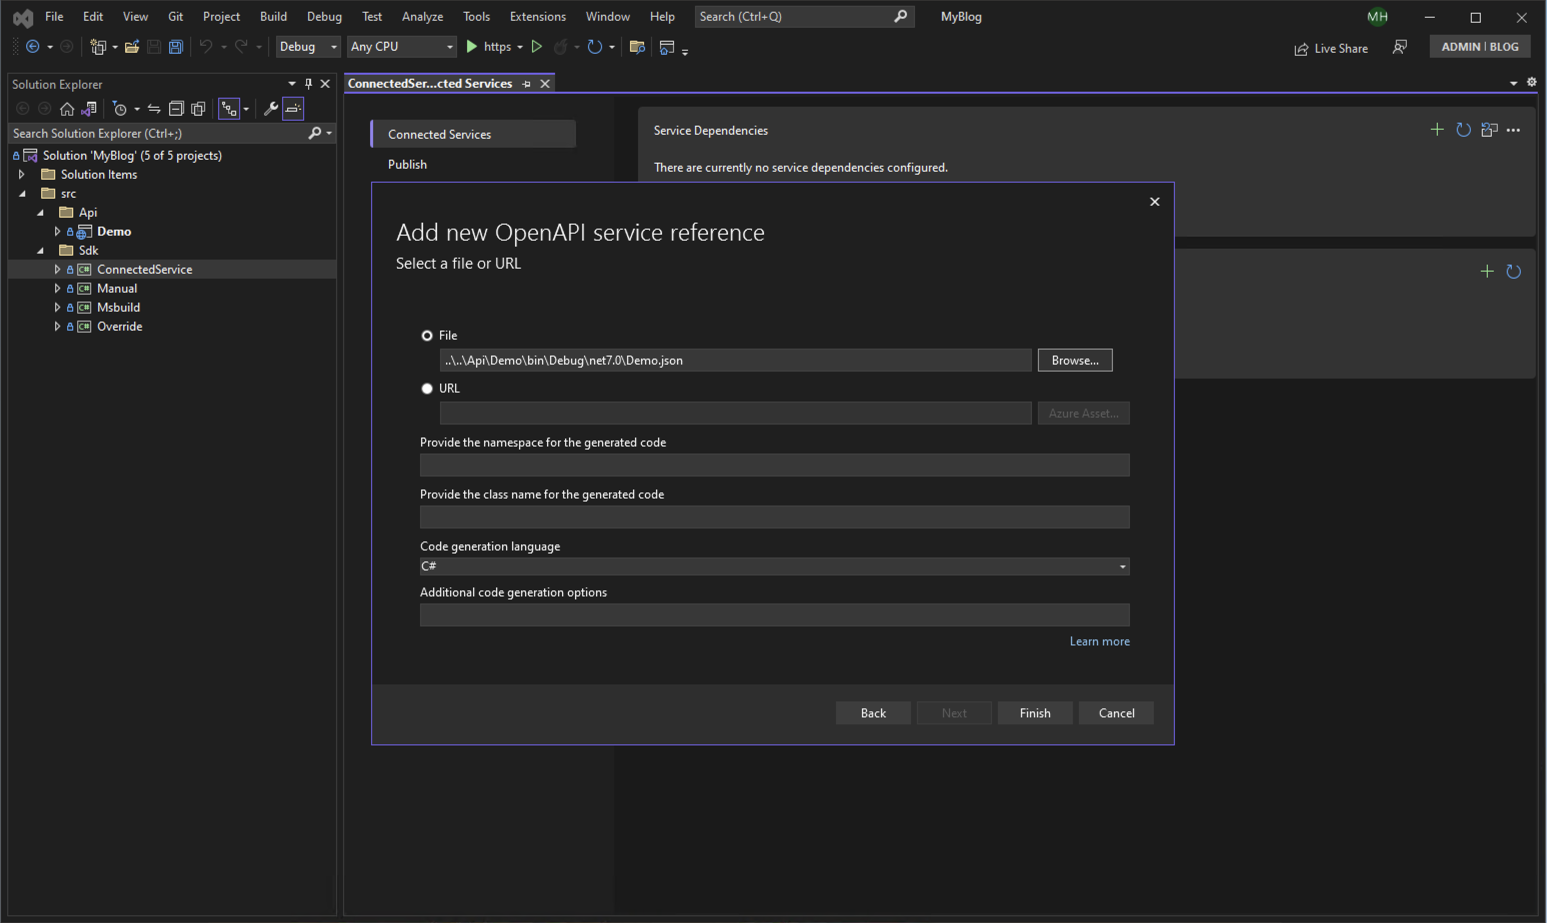
We can customize the input for the msbuild task on the third screen. We only need to specify the file location of the Open API JSON.

By selecting "finish", Visual Studio will make all necessary modifications. Easy right? The project file should now look like this:
<ItemGroup>
  <OpenApiReference Include="..\..\Api\Demo\bin\Debug\net7.0\Demo.json"
                    CodeGenerator="NSwagCSharp"
                    Link="OpenAPIs\Demo.json" />
</ItemGroup>

<ItemGroup>
  <PackageReference Include="Microsoft.Extensions.ApiDescription.Client" Version="3.0.0">
    <PrivateAssets>all</PrivateAssets>
    <IncludeAssets>runtime; build; native; contentfiles; analyzers; buildtransitive</IncludeAssets>
  </PackageReference>
  <PackageReference Include="Newtonsoft.Json" Version="13.0.1" />
  <PackageReference Include="NSwag.ApiDescription.Client" Version="13.0.5">
    <PrivateAssets>all</PrivateAssets>
    <IncludeAssets>runtime; build; native; contentfiles; analyzers; buildtransitive</IncludeAssets>
  </PackageReference>
</ItemGroup>
The generated code will be in the obj folder if you build the project. As mentioned above, the API specification is in the Debug/net7.0 folder, so it will break if I retarget this solution to a newer framework. That is another reason to just put the specification at the root of the API project.
Using OpenAPI reference from command line
You may wonder if it is as simple if you do not have Visual Studio as your IDE. It is; Microsoft published a dotnet tool for this exact reason. You can install it by running dotnet tool install --local Microsoft.dotnet-openapi --version 7.0.4. You can add the API specification by using a terminal from your project's directory and running the following command.
dotnet dotnet-openapi add file ..\..\Api\Demo\bin\Debug\net7.0\Demo.json
The result looks like this:
<ItemGroup>
  <PackageReference Include="Newtonsoft.Json" Version="12.0.2" />
  <PackageReference Include="NSwag.ApiDescription.Client" Version="13.0.5" />
</ItemGroup>
<ItemGroup>
  <OpenApiReference Include="..\..\Api\Demo\bin\Debug\net7.0\Demo.json" />
</ItemGroup>
Yeah, that is right, it is similar but not the same as if done via Visual Studio.
- The package
Microsoft Extensions ApiDescription Clientis missing. - The version for NewtonSoft is different.
- The CodeGenerator is not specified, and it defaults to
NSwagCSharp. I expected the tool to use the same templates as Visual Studio, but this is not the case. The missing package is still used, but as a transitive dependency ofNSwag.ApiDescription.Client, with the installed version it is just a preview build.
Do note that it is not required to use the dotnet tool for this; you can manually add the same lines as provided above. The tool is just there for convenience. Documentation for the tool is still somewhat limited but is described at the docs over here.
Influence created output
We have already seen that for the manual approach, making changes to the configuration can be done by modifying the nswag.json, a file we do not have when using OpenApiReference. So this section will go into making the same modification for this version.
Before I go into it, we must fix one issue with the template used so far. There is a glaring issue which only appears if you have built the project in different ways. For example, here is the output building from Visual Studio
1>GenerateNSwagCSharp:
1>  "C:\Users\hamulyak\.nuget\packages\nswag.msbuild\13.0.5\build\../tools/Win/NSwag.exe" openapi2csclient /className:DemoClient /namespace:ConnectedService /input:C:\projects\BlogTopics\MyBlog\src\Api\Demo\bin\Debug\net7.0\Demo.json /output:obj\DemoClient.cs
1>NSwag command line tool for .NET 4.6.1+ WinX64, toolchain v13.0.5.0 (NJsonSchema v10.0.22.0 (Newtonsoft.Json v11.0.0.0))
1>Visit http://NSwag.org for more information.
1>NSwag bin directory: C:\Users\hamulyak\.nuget\packages\nswag.msbuild\13.0.5\tools\Win
1>Code has been successfully written to file.
Compare that with the output from the dotnet CLI:
  GenerateNSwagCSharp:
    dotnet --roll-forward-on-no-candidate-fx 2 C:\Users\hamulyak\.nuget\packages\nswag.msbuild\13.0.5\build\../tools/NetCore21//dotnet-nswag.dll openapi2csclient /className:DemoClient /na
  mespace:ConnectedService /input:C:\projects\BlogTopics\MyBlog\src\Api\Demo\bin\Debug\net7.0\Demo.json /output:obj\DemoClient.cs
  NSwag command line tool for .NET Core NetCore21, toolchain v13.0.5.0 (NJsonSchema v10.0.22.0 (Newtonsoft.Json v11.0.0.0))
  Visit http://NSwag.org for more information.
  NSwag bin directory: C:\Users\hamulyak\.nuget\packages\nswag.msbuild\13.0.5\tools\NetCore21
  Code has been successfully written to file.
Do you see the issue? The CLI variant differs from the NSwag version used; it uses a NetCore21 dll. We get this behaviour because the templates use an outdated package version. According to NuGet the old version (13.0.5) is downloaded over 2 million times, whereas all other versions do not exceed half a million. After updating, the NSwag version will equal your project's target framework.
Back to the issue at hand, how do we customize the output? It is a mix-match situation. You can modify the Namespace and Client name directly by specifying them as properties on the OpenApiReference line like this:
<OpenApiReference Include="..\..\Api\Demo\bin\Debug\net7.0\Demo.json"
                  CodeGenerator="NSwagCSharp"
                  Namespace="MyNamespace"
                  ClassName="MyClient"
                  Link="OpenAPIs\Demo.json" />
Other options, like the JsonLibrary, need to be formatted differently. Like Namespace, there is an Options attribute. For example, we change the configuration below to use SystemTextJson and provide a custom name for the Exception class in the generated code base.
<OpenApiReference Include="..\..\Api\Demo\bin\Debug\net7.0\Demo.json"
                  CodeGenerator="NSwagCSharp"
                  Options="/JsonLibrary:SystemTextJson /ExceptionClass:DemoApiException"
                  ClassName="MyClient"
                  Link="OpenAPIs\Demo.json" />
Any value set by nswag.json can also be provided here in the format /propertyName:value. I like to point out that properties like namespace can not be set here, so the following snippet will not work.
<OpenApiReference
  Include="..\..\Api\Demo\bin\Debug\net7.0\Demo.json"
  CodeGenerator="NSwagCSharp"
  Options="/Namespace:MyNamspace /JsonLibrary:SystemTextJson /ExceptionClass:DemoApiException"
  ClassName="MyClient"
  Link="OpenAPIs\Demo.json" />
The reason is that task creates the following NSwag command (displayed in the output window)
dotnet --roll-forward-on-no-candidate-fx 2 "C:\Users\hamulyak\.nuget\packages\nswag.msbuild\13.18.2\build\../tools/Net70//dotnet-nswag.dll" openapi2csclient /className:MyClient /namespace:Override /input:"C:\projects\BlogTopics\MyBlog\src\Api\Demo\bin\Debug\net7.0\Demo.json" /output:"obj\DemoClient.cs" /Namespace:MyNamspace /JsonLibrary:SystemTextJson /ExceptionClass:DemoApiException
It has a duplicate /Namespace, and the first wins. The only way to customize the namespace is by providing it as an attribute. Otherwise, the default value, which is the assembly name, will be used.
Conclusion
In conclusion, I cannot deny that the OpenApiReference feels a lot easier than the manual approach. It has its issues. For example, the lack of documentation configuring the generated code is disappointing. I also think it is weird that the different approaches between Visual Studio and command-line are out of sync and that both templates are outdated. It makes me question if people are using it. Both reasons are not a hard no-go for me. The new approach does feel less like magic, but the trade-off for me is that the settings used are less transparent than a nswag.json file. As I showed in the previous version of this article, NSwag can also function without specifying all options and will apply the defaults themselves. I like things to be explicit, so that is a point in favour of the manual approach, that it gives me a choice to specify everything or omit the things I don't need. The abstraction might have been better if we could still provide a config file or if there were properties that Microsoft would map to NSwag stuff internally, decoupling my code generation from the implementation. What do you think about this? Which version do you prefer?
As always, if you have any questions, feel free to reach out. Do you have suggestions or alternatives? I would love to hear about them.
The corresponding source code for this article is on GitHub.
See you next time, stay healthy and happy coding to all 🧸!